
目次
1. エフェクトを考えていこう!
「code」フォルダの中のpart07_base のdisplay()部分にさまざまなエフェクトを追加していこう!
まずは,コメントアウト(//のマーク)を解除して動きをエフェクトの動作を確認していこう!(update()についてもコメントアウトを解除しよう!)
 // エフェクトを描画するメソッド
  void display() {

    //////////////
    //ここにエフェクトを追加していく!

    //stageEffect.display(); // 他のエフェクトより先に書く→エフェクトの下にstageEffectがかかる
    randomShapes.display();
    //chaserLine.display();

    // ----- チュートリアル ------
    // 顔の前に四角形
    //fill(255,150);
    //rect(poseData.x[0]-100/2, poseData.y[0]-100/2, 100, 100);

    // 左肘に四角形
    //fill(255,150);
    //rect(poseData.x[7]-50/2, poseData.y[7]-50/2, 50, 50);

    // ランダムの四角形
    //for(int i=0; i<10; i++){
    //  fill(random(50,250), random(100,150), random(120,200), 150);
    //  float _w = random(10,50);
    //  float _h = random(10,50);
    //  int index = 0;

    //  // 最も動きの大きいところにエフェクトを割り当てる
    //  index = poseData.avgDD_maxindex;

    //  rect(poseData.x[index]-_w/2+random(-50,50), poseData.y[index]-_h/2+random(-50,50), _w, _h);
    //}
    // ----- チュートリアルここまで ------

    //////////////

    if (visible)
      drawBone();
  }
MovieタブのnumFramesの数値を小さくすることで、短い時間で結果を確認できます(画像の読み込み数が少なくなる)。

エフェクトの参考サイトをいくつか貼っておきます。この辺りコードを読み解きながら、自分のコードに落とし込んでいこう!
参考サイト
- 公式サイトのサンプル
- 比較的理解しやすいコードです。使えそうなコードを抜き取って、エフェクトに変換してみよう!
- OpenProcessing
- クリエイティブ・コーディング・コミュニティのためのプラットフォームであり、ユーザーがP5.js(JavaScriptのライブラリ)やProcessing(Javaベースのプログラム言語)を使用してスケッチやアートワークを作成、共有、探索することができます。
- p5.jsが混じっているので注意が必要ですが、かっこいいエフェクトもたくさん置いてあるので、参考にしてみて下さい。
- ChatGPT
- うまく動かない時はChatGPTなどLLMに色々質問してみよう!
2. Effectの応用方法
2.1 ランダムに好きな図形を表示させてみる
RandomShapes.pde
// ランダムな位置に図形を表示する
class RandomShapes {
int maxShapes = 10;
ArrayList<Shape> shapes = new ArrayList<Shape>();
void update(float _x, float _y) {
// _x, _y周辺のランダムな位置に新しい図形を作成してリストに追加
float x = random(_x - 40, _x + 40);
float y = random(_y - 40, _y + 40);
float w = random(10, 40);
float h = random(10, 40);
float alpha = random(50, 200);
CustomColor c = new CustomColor(random(255), random(255), 255, alpha);
shapes.add(new Shape(x, y, w, h, c));
}
void display() {
// 全ての図形を描画
for (Shape shape : shapes) {
shape.update();
shape.display();
}
// 最大数を超えたら最初の図形を削除
if (shapes.size() > maxShapes) {
shapes.remove(0);
}
}
// ----------- ここから下で図形一つ一つの詳細を設定 -----------
// Shapeクラスの図形が表示される
class Shape {
// Shapeの位置や色を持っておく変数
float x, y, w, h;
CustomColor shapeColor;
// 使用したい図形のクラスを指定
// CustomShape customShape = new CustomShape(); // CustomShapeクラスを使用する
Star customShape = new Star(20); // Starクラスを使用する例
// ------ 初期化 ------
Shape(float x, float y, float w, float h, CustomColor shapeColor) {
this.x = x;
this.y = y;
this.w = w;
this.h = h;
this.shapeColor = shapeColor;
}
// ------ 更新 ------
//フレームごとにupdate内の変更が行われる
void update() {
// 色の更新
this.shapeColor.a -= 2; // アルファ値を減少させる(少しずつ透明になっていく)
// 図形の更新:Shape内で最初に作成した図形のクラスのupdateを呼び出している
customShape.update();
}
// ------ 描画 ------
// この関数内で図形一つ一つの描画方法を指定
void display() {
// 塗りつぶす色を指定
fill(shapeColor.r, shapeColor.g, shapeColor.b, shapeColor.a);
// ここで図形を描画する方法を指定
rect(x-w/2, y-h/2, w, h); // 四角を描画
}
}
// 色を簡単に扱うためのクラス
class CustomColor {
float r, g, b, a;
CustomColor(float r, float g, float b, float a) {
this.r = r;
this.g = g;
this.b = b;
this.a = a;
}
}
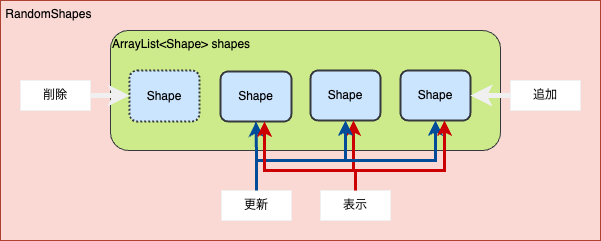
}この時、
- RandomShapesは図形をたくさん持つリストを扱う
- リストそのものの操作(追加や削除)
- リスト内の図形全てを操作(それぞれを更新や表示する関数を呼び出す)
- Shapeは図形ひとつひとつの情報をもつ
- どのような図形か、位置や大きさ、色、更新の方法
Shapeクラスのdisplay内が表示されるので、ここを書き換えれば好きな図形を表示できる!
例:長方形
// ------ 描画 ------
// この関数内で図形一つ一つの描画方法を指定
void display() {
    // 塗りつぶす色を指定
    fill(shapeColor.r, shapeColor.g, shapeColor.b, shapeColor.a);

    // ここで図形を描画する方法を指定
    rect(x-w/2, y-h/2, w, h); // 四角を描画
}
例:楕円
// ------ 描画 ------
// この関数内で図形一つ一つの描画方法を指定
void display() {
    // 塗りつぶす色を指定
    fill(shapeColor.r, shapeColor.g, shapeColor.b, shapeColor.a);

    // ここで図形を描画する方法を指定
    ellipse(x, y, w, h); // 楕円を描画
}
2.2 図形のクラスを読み込んで表示させてみる
Shapeクラスで図形のクラスを読み込むことで、リスト内のShapeが作成した図形のクラスを持つようにする
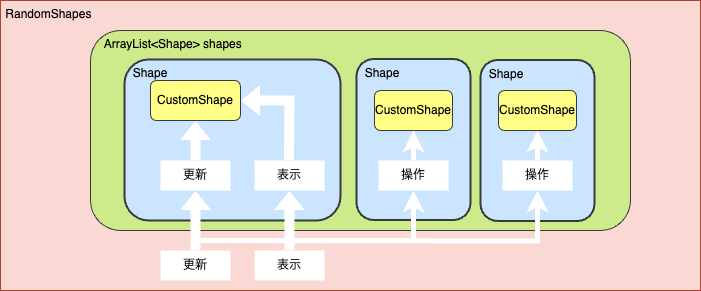
今回は、試しにStarというクラスを読み込んでみる。
ソースコードは以下のようになる
// ----------- ここから下で図形一つ一つの詳細を設定 -----------
  // Shapeクラスの図形が表示される
  class Shape {
    // Shapeの位置や色を持っておく変数
    float x, y, w, h;
    CustomColor shapeColor;

    // 使用したい図形のクラスを指定
    Star customShape = new Star(20); // Starクラスを使用する例


    // ------ 初期化 ------
    Shape(float x, float y, float w, float h, CustomColor shapeColor) {
      this.x = x;
      this.y = y;
      this.w = w;
      this.h = h;
      this.shapeColor = shapeColor;
    }

    // ------ 更新 ------
    //フレームごとにupdate内の変更が行われる
    void update() {
      // 色の更新
      this.shapeColor.a -= 2; // アルファ値を減少させる(少しずつ透明になっていく)

      // 図形の更新:Shape内で最初に作成した図形のクラスのupdateを呼び出している
      customShape.update();
    }

    // ------ 描画 ------
    // この関数内で図形一つ一つの描画方法を指定
    void display() {
      // 塗りつぶす色を指定
      fill(shapeColor.r, shapeColor.g, shapeColor.b, shapeColor.a);

      // ここで図形を描画する方法を指定
      customShape.display(x,y); // Shape内で最初に作成した図形のクラスのdisplayを呼び出している
    }
  }
Star customShape = new Star(20);でStarクラスの特性を持つ物体(インスタンスという)をひとつ作成している。
この時、(20)はこのクラスを作成する時に与える大きさのパラメータである。
※Starクラス内でどのようなパラメータを与えることができるかを定義している。
Star(int r){this.r1 = r;}
詳しく知りたい人はコンストラクタで調べてみよう。
そしてupdate()内でcustomShape.update();を、
display()内でcustomShape.display(x,y); を呼び出すことで、
作成した図形のクラスのupdate,display関数をそれぞれ呼び出している。
2.3 図形のクラスを作成してみる
上で使用したStarクラスから図形のクラスの作り方を見てみよう。
class Star {
  // クラスの持つ変数
  float rate = 0.6; // 星の凹み具合
  float ang = radians(-36);
  float theta ;
  int r1;

  Star () {
    this.r1 = 100;
    this.theta = radians(-90);
  }

  Star(int r){
    this.r1 = r;
  }

  // update()が呼び出されるとこの図形の情報が更新される
  void update() {
    this.r1 -= 1;
    this.theta += radians(10); // 回転の大きさ
  }

  // display()が呼び出されるとこの内容が描画される
   void display(float x, float y){
    int r2 = int(r1 * rate);

    // xとyの座標の整数を10個持つ配列
    int[] xPoints = new int[10];
    int[] yPoints = new int[10];

     // 角度と円の半径から三角関数を用いて座標を計算
     for (int i = 0; i < 10; i++) {
      // 角度を変えて10個の点の座標を追加
      float currentAngle = theta + ang * i;
      if (i % 2 == 0) {
        // 偶数番目は大きい(半径r1)円上に
        xPoints[i] = int(r1 * cos(currentAngle) + x);
        yPoints[i] = int(r1 * sin(currentAngle) + y);
      } else {
     // 奇数番目は小さい(半径r2)円上に
        xPoints[i] = int(r2 * cos(currentAngle) + x);
        yPoints[i] = int(r2 * sin(currentAngle) + y);
      }
    }

    // 10個の点を繋いで多角形を描画
    beginShape();
    for (int i = 0; i < 10; i++) {
      vertex(xPoints[i], yPoints[i]);
    }
    endShape(CLOSE);
  }

}
2.3.1 変数
クラス内で宣言した変数はthis.<変数名>として使用できる。
この変数はそのクラスから作られた物体ひとつひとつが個々に持つ変数である。
例えば同じクラスから2つ図形を作ったとして、この変数の値は二つの間では共有されない。
そのため、同じStarクラスから作った星形でも大きさや回転の角度などが異なるものが作成できる。
2.3.2 updateメソッド
呼び出されるごとに図形の情報が更新される。
今回の例ではthis.r1 -= 1;で大きさを小さく、
this.theta += radians(10);で回転させている。
2.3.3 displayメソッド
実際にどんな図形を描くかをここに記述する。
例のコードでは、10個の点を作って、その点を繋いで塗りつぶすことで星形を描いている。
2.3.4 コンストラクタ
クラス名と同じ名前の関数のようなものはコンストラクタと呼ばれ、
最初にこのクラスを持つ値(インスタンス)を作る時に呼び出される。
先ほどのコードのStar customShape = new Star(20);を実行すると、
Starクラスを作った後にStar(int r){ this.r1 = r; }が実行され、
r1=20というように値がセットされる。
その他様々なStageEffectやChaserLineなどのエフェクトが設定できます。

3. その他サンプル(発展編)
土田がいくつか作ってみたので、それらも参考にしてみて下さい。基本的にはOpenProcessingで検索かけて良さそうなエフェクトを取ってきてます。サンプルはcodeフォルダの中のpart07_s***です。
土田の考え方のステップとしては、
- マウスに追従するエフェクトを作ってみる。(base)
- エフェクトをClass化する。(base_class)
- 今回取り組んでいるメインのコード(part07_base)に統合する。
で、進んでます。
ただ、Classにする必要は別になくて、display()の中にゴリゴリ書いていく方針で特に問題ないと思います。
※ Classの説明は時間がかかるため、今回は省いちゃってます。Classを使うと、コードの管理が楽になります。
3.1 サンプル一覧


3.2 S1(Sample1)について簡単に解説
part07_s1_base
エフェクトがマウスに追従する
// 最大の円の数を定義
int maxCircles = 10;

// 円を格納するためのArrayList
ArrayList<Circle> circles = new ArrayList<Circle>();

void setup() {
  size(1000, 1000);  // 描画ウィンドウのサイズを設定
  background(255);   // 背景色を白に設定
  noStroke();        // 線の描画を無効化
}

void draw() {
  background(255);  // 背景を毎フレーム白でクリア

  // マウスの周りにランダムな位置に新しい円を作成
  float x = random(mouseX - 80, mouseX + 80);
  float y = random(mouseY - 80, mouseY + 80);
  float w = random(10, 40);
  float h = random(10, 40);
  float alpha = random(50, 200);

  // ランダムな色を作成
  CustomColor c = new CustomColor(random(255), random(255), 255, alpha);

  // 新しい円をリストに追加
  circles.add(new Circle(x, y, w, h, c));

  // リスト内の全ての円を更新および描画
  for (Circle circle : circles) {
    circle.update();
    circle.display();
  }

  // 最大数を超えたら最初の円を削除
  if (circles.size() > maxCircles) {
    circles.remove(0);
  }
}

// Circleクラスの定義
class Circle {
  float x, y, w, h;
  CustomColor circleColor;  // 円の色

  // コンストラクタ
  Circle(float x, float y, float w, float h, CustomColor circleColor) {
    this.x = x;
    this.y = y;
    this.w = w;
    this.h = h;
    this.circleColor = circleColor;
  }

  // 円の状態を更新する関数(アルファ値を減少)
  void update() {
    this.circleColor.a -= 2;
  }

  // 円を描画する関数
  void display() {
    fill(circleColor.r, circleColor.g, circleColor.b, circleColor.a);
    ellipse(x, y, w, h);
  }
}

// カスタム色を表すクラス
class CustomColor {
  float r, g, b, a;  // 色の各成分

  // コンストラクタ
  CustomColor(float r, float g, float b, float a) {
    this.r = r;
    this.g = g;
    this.b = b;
    this.a = a;
  }
}上のコードをCircleSystemとしてクラス化しました。
これにより、任意の点を中心としたエフェクトを設定しやすくなりました。
//*** 新しいエフェクト ***
CircleSystem circleSystem = new CircleSystem();

void setup() {
  size(1000, 1000);  // 描画ウィンドウのサイズを設定
  background(255);   // 背景色を白に設定
  noStroke();        // 線の描画を無効化
}

void draw()
{
  background(255); // 背景を白でクリア

  circleSystem.update(mouseX, mouseY);
  circleSystem.display();
}

class CircleSystem {
  int maxCircles = 10;
  ArrayList<Circle> circles = new ArrayList<Circle>();

  void update(float _x, float _y) {
    // 新しい円を作成してリストに追加
    float x = random(_x - 40, _x + 40);
    float y = random(_y - 40, _y + 40);
    float w = random(10, 40);
    float h = random(10, 40);
    float alpha = random(50, 200);
    CustomColor c = new CustomColor(random(255), random(255), 255, alpha);
    circles.add(new Circle(x, y, w, h, c));
  }

  void display() {
    // 全ての円を描画
    for (Circle circle : circles) {
      circle.update();
      circle.display();
    }

    // 最大数を超えたら最初の円を削除
    if (circles.size() > maxCircles) {
      circles.remove(0);
    }
  }

  class Circle {
    float x, y, w, h;
    CustomColor circleColor;

    Circle(float x, float y, float w, float h, CustomColor circleColor) {
      this.x = x;
      this.y = y;
      this.w = w;
      this.h = h;
      this.circleColor = circleColor;
    }

    void update() {
      this.circleColor.a -= 2;  // アルファ値を減少させる
    }

    void display() {
      fill(circleColor.r, circleColor.g, circleColor.b, circleColor.a);
      ellipse(x, y, w, h);
    }
  }

  class CustomColor {
    float r, g, b, a;

    CustomColor(float r, float g, float b, float a) {
      this.r = r;
      this.g = g;
      this.b = b;
      this.a = a;
    }
  }
}CircleSystemという新規タブを作成する。Processing画面のタブの一番右にある「▼」をクリックして新規タブを押して下さい。
新規タブの中に上のclass CircleSystem{} (Classのみコピーする)をコピー&ペースト。
あとはsettings()などが書かれているメインのコードで以下のコードを追記
import java.util.LinkedList;
final static int DISPLAY_W = 960;
final static int DISPLAY_H = 540;

Movie movie = new Movie(); //動画管理
Effector effector = new Effector(); //エフェクト管理
PoseData poseData = new PoseData(); //PoseData管理

//*** 新しいエフェクト ***
CircleSystem circleSystem = new CircleSystem();

void settings()
{
  size(DISPLAY_W, DISPLAY_H); // 描画ウィンドウのサイズを設定
}
Effectorタブの中のupdate()とdisplay()のそれぞれに以下のコードを追記。
// エフェクトを更新するメソッド
  void update() {
    if (currentFrame<poseData.getRowCount()) {

      poseData.update(); //PoseDataの更新
      circleSystem.update(poseData.x[poseData.avgDD_maxindex], poseData.y[poseData.avgDD_maxindex]);
    }
  }

  // エフェクトを描画するメソッド
  void display() {

    //////////////
    //ここにエフェクトを追加していく!
    circleSystem.display();
    //////////////

    if (visible)
      drawBone();
  }
実行するとエフェクトが最も動きが速い部分に追従していることがわかるかと思います。
この流れが理解できれば、OpenProcessingに掲載されているさまざまなエフェクトを適用していくことができると思います!
